
How to Spy on Text Messages from Computer & Vivo X90S | Dr.fone
How to Spy on Text Messages from Computer & Vivo X90S
Do you suspect that your child is communicating with the wrong individuals? While cellphones are meant to give everyone the ability to communicate, their secretive nature can also nurture society’s ills, and children, especially teenagers can fall prey to these. Yet, as a parent, it can be very hard to monitor what your child is doing on your device. That’s why we thought it wise to share with you a few ways you can spy on someone’s text messages from your device or computer.
Part 1: How to Spy on text messages from another Android phone
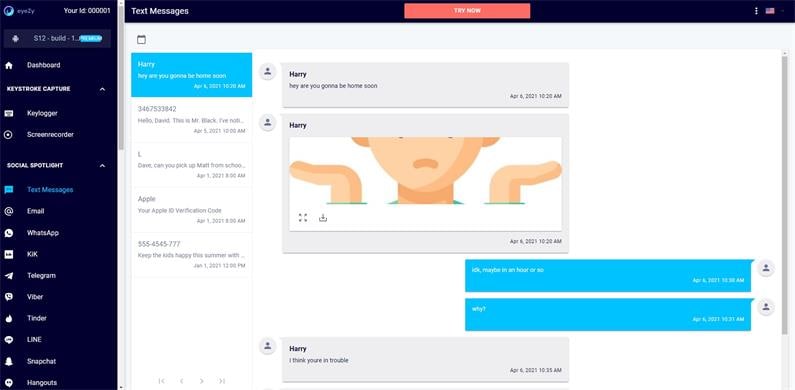
To spy on another android device’s text messages, you will need to install spy software on that device. One of the best monitoring programs for the task is eyeZy. It is affordable, easy to install, and above all gives you access to the target device’s text messages remotely. EyeZy can also provide you with a wealth of other information about the target device including call history, browsing history, and even GPS location.
Here’s how to spy on another Android device’s text messages using eyeZy.
Step 1: The first step is to register for an eyeZy account on the eyeZy website. You can choose to purchase a 1 monthly/3 monthly/12 monthly subscription.
Step 2: Once you’ve registered and paid for your account, you will receive an email with all the information to help you download and install the software. The set-up wizard is very detailed and easy to follow.
Step 3: Once set up is complete, you can go to your eyeZy dashboard on any other Android device to begin monitoring the text messages on the target device.


Part 2: How to Spy on text messages from another iPhone
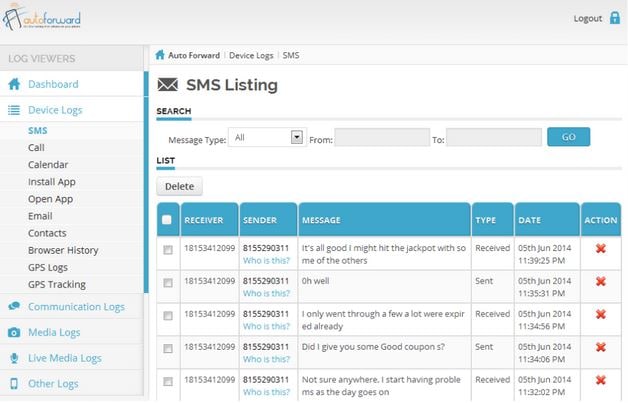
For iPhone users, one of the best spy apps to use is Auto Forward. This app allows users to spy on another iPhone without the target device’s owner knowing. It has a major advantage in that it allows the user to see all messages including those the owner of the Vivo X90S device may have deleted. You can also see both sent and received messages.
Here’s how to use Auto Forward to spy on another iPhone’s text messages.
Step 1: To begin with, download and install Auto Forward onto your computer or another iOS device.
Step 2: Log in to your account (that you would have created before installing the app) and enter the Apple ID and password of the iPhone you want to spy on.
Step 3: The app will automatically access all messages on the target device. It will however only work if you have the target device’s Apple login details.
Part 3: How to Spy on text messages from computer
If you want to spy on someone else’s text messages on your computer, a monitoring program like mSpy might be a good choice. As one of the best spy apps in the business, mSpy gives you the ability to monitor any device both Android and iOS remotely from any computer. It is easy to install and will provide you with additional information about the target device including call history, browsing history, and even email tracking.
Here’s how to use mSpy to spy on another phone’s text messages.
Step 1: You will need to first purchase a mSpy subscription from the program’s website. There are a lot of plans to choose from so choose one that meets your needs.
Step 2: Once you’ve paid for your subscription, mSpy will send you an email with your login information as well as installation information. The steps are easy to follow.
Step 3: You should be able to log in to your web-based control panel and view the messages as soon as the installation is complete.

The above three solutions enable users to monitor more than just text messages. They give parents the ability to keep track of what their children are saying to one another or who they are talking to. While there are many applications to spy monitoring software, perhaps the most important is in ensuring the safety of our young people.
How to Track Vivo X90S by Phone Number
In most cases, tracking a lost iPhone has always been made possible thanks to the presence of tracking apps, and the use of the IMEI number. However, in the past few years, it has always been in the public domain and in the minds of many technocrats about the possibility of tracking an iPhone by only using its phone number (cellular number). Regardless of what has been said, tracking an iPhone using its number alone is a process that requires an in-depth understanding and application. In this article, we are going to take a look at the possibility of how to track an iPhone by phone number, as well as the use of the mSpy program to track a lost iPhone.
- Recommended location faker tool: Dr.Fone - Virtual Location - change your mobile device GPS to any place in the world with just 1 click !
Part 1: Is It Possible to Track An iPhone with Just the Number?
A lot of people have always asked me; is it possible to track my iPhone by phone number? Well; regardless of what people say out there, it is usually close to impossible to track your lost iPhone by primarily using only its phone number. In this case, the phone number in question is the number provided to you by your cellular provider. The moment you lose your iPhone, the chances of the thief changing your SIM card to another SIM card are high. This obviously makes it impossible to track your iPhone via a number that is no longer available. However, there’s a leeway on how to track an iPhone by phone number though it depends on sheer chances and lack.
You can only track iPhone by phone number only if the culprit with the phone doesn’t change the SIM card. This is a sheer lack of procedure when you consider the fact that people nowadays steal phones and change the Sim cards as well as the IMEI numbers. If you want to track your iPhone in such cases, your only option would be to contact your cellular provider and ask them to perform a phone triangulation procedure or tell you if any calls were made using your number. Regardless of the type of iPhone tracking services, you might decide to use; the fact still remains that they can’t track your lost iPhone using the phone number. So don’t be duped by these companies or apps that claim to track your lost phone by using the phone number. What they can only do for you is to tell you the last position where the phone was detected, or if any calls were made and to whom. Basically, for you to trace your iPhone, you need its IMEI number, but not the phone number.
 DEX 3 RE is Easy-To-Use DJ Mixing Software for MAC and Windows Designed for Today’s Versatile DJ.
Mix from your own library of music, iTunes or use the Pulselocker subsciprtion service for in-app access to over 44 million songs. Use with over 85 supported DJ controllers or mix with a keyboard and mouse.
DEX 3 RE is everything you need without the clutter - the perfect 2-deck mixing software solution for mobile DJs or hard-core hobbiests.
PCDJ DEX 3 RE (DJ Software for Win & MAC - Product Activation For 3 Machines)
Part 2: How to Track iPhone Online via mSpy
Since it is impossible to track iPhone via the phone number, you can employ the use of secondary software and apps to track and primarily retrieve your iPhone from whoever has the phone. In this case, the application of mSpy would be highly recommended. The mSpy program is a highly versatile program that can be used to perform various functions depending on the preferences of the user. In our case at hand, you can use this program to track your iPhone regardless of what part of the world the phone could have been taken to or located.
TIP: Please note that you can only track down your iPhone using mSpy by first installing the app on your phone. Without the installation process, tracking your phone using mSpy will be close to impossible.
The following is a detailed process on how to track an iPhone by number using mSpy phone locating feature.
Step 1: Purchase the App
Your first step is to go to the mSpy official website to download this program and install it on your iPhone. What you need to do is to visit the official mSpy website and purchase the services offered by the program. The price you choose will depend on your preferences.
Step 2: Download and Install the App
Once you have made the purchase, a download link will be sent to your designated email address provided in the first step. Just follow the steps and procedures provided by the link. You don’t have to be worried about any complex installation guides as compared to other programs since the process of installing this program is straightforward. Just make sure that you have the phone that you want to track with you since you will be required to install this program on the iPhone. As for the details, please refer to how to install mSpy on Android and iPhone.
Step 3: Start Monitoring
With each and every step followed as required, your next step will be to start monitoring the targeted phone. For you to start tracking the phone, just login into your mSpy account and access the control panel. From this area, you will be in a position tell the location of the iPhone and check the route used over the specific period of time that the phone has been missing. All of this is made possible by the presence of the detailed map displayed on the control panel. There you have it. You can now track iPhone by phone number using mSpy without the knowledge of the current holder.
 CollageIt Pro
Tracking a lost phone can be fun and at the same time a daunting task. The outcome or the general experience of tracking a lost phone will solely depend on the methods applied in the overall process. As we have seen in this article, though many people may argue that it is possible to track an iPhone by the number it is evident that the overall process can be problematic and in most cases, impossible. The only way out of tracking and finding your phone is by using the IMEI number. Any other number used for iPhone tracking purposes will only be for gathering information for investigative reasons.
How to Turn Off Google Location to Stop Tracking You on Vivo X90S
The location services that Google provides to Android smartphones are indeed useful in many ways. For instance, you can use Google Maps to check a particular place you want to visit and obtain reliable directions to help you get there. Another thing, Google can also give you the exact location of your Vivo X90S in case you lost it somewhere. Indeed, Google’s GPS tracking feature comes in very handy whenever you need such assistance.
It’s true to say that Google’s location monitoring services offer tons of benefits to us. But at some point, we cannot deny that activating this feature somehow entails a certain privacy and security risk. That’s why many users opt to turn off Google location tracking and keep their whereabouts private. Don’t worry. It’s totally fine. You can implement such measures, too, if you’re uncomfortable sharing your location details with Google. All it takes to turn off Google location tracking is just a few taps on your mobile device.
In this article, we will discuss how Google employs location access on your mobile device. We will also provide some quick tutorials on how to turn off Google location tracking in easy steps. Continue reading below to learn more.
Part 1. Understanding How Google Uses Location Data
Location data generally helps us find reliable directions and pinpoint a particular place. But apart from that, this piece of information actually serves a bigger purpose. Google, in particular, employs location data to provide high-quality services tailored to specific preferences and necessities of the users. Each Google product relies heavily on location information and utilizes it for various reasons. To understand it better, check out the list below.

It is an essential component of most Google services
![]()
Of course, Google Maps and Weather will not work without access to location data. It is the main component that allows this kind of application to function exactly as it should. That’s why you should think twice before you turn off Google location tracking. Keep it activated on your mobile device if you’re in need of real-time weather updates or reliable coordinates.
It is used for targeted advertisements
The majority of online advertisements scattered all over the internet are run by Google. It uses location data to ensure the ads that appear on your web browser are relevant to your personal liking. For example, Google Ads will likely flash American products on your smartphones if you’re located in that particular region. Do you want to keep it that way? If so, you should not then turn off Google location tracking on your Vivo X90S smartphone.
It is used by Google to provide accurate search results
![]()
The same thing goes for Google search results. This query engine uses location data to provide information relevant to the specific needs of the user. Let’s say you’re currently residing in Japan and looking for nearby coffee shops. Of course, it will be unhelpful if Google dispenses a list of coffee shops that aren’t located in your country. That’s why you shouldn’t turn off Google location tracking on your smartphone if you’re looking for precise and pertinent answers.
It is used by Google to implement certain security protocols
Google uses location data to keep your accounts safe from potential attacks and security breaches. How so? Well, Google immediately sends alerts whenever your account is used from an unusual location. Another thing is that strange activities on your account are promptly detected with the aid of location information. Simply put, allowing Google to access your whereabouts is the least you can do to protect your digital assets. Hence, don’t turn off Google location tracking on your Vivo X90S smartphone if you need such assistance.
It is utilized for research and further improvements of Google services
![]()
We all know that Google is committed to offering us new products and improving its existing services. That’s indeed beneficial to all of us, especially in today’s ever-changing world. But definitely, it’s not possible if Google doesn’t have adequate location information from the pool of its users. Why so? Simply because location data determines the latest community trends and helps specialists find the perfect basis for fresh developments. Do you want to contribute something to the advancement of Google products? If so, you can start by giving Google access to the location data on your Vivo X90S smartphone.
Part 2. Top 4 Techniques to Turn Off Google Location Tracking on Android
There’s no denying that Google uses location information to give us the best experience possible. However, it doesn’t necessarily mean there is no risk at all. We cannot rule out the possibility of data breaches and disclosure of location information that is supposed to be private. If you’re worried about this kind of situation, you can prevent it from happening in a snap of a finger. Check out the four methods below on how to turn off Google location tracking on your Vivo X90S smartphone.
Method 1: Turn off the location services on your Vivo X90S mobile device
“How to stop Google from tracking me?” Well, it’s actually very easy. You just need to deactivate the location service on your Vivo X90S mobile device. After that, Google and other GPS-based applications on your smartphone will immediately lose access to your location data. Do you want to try it now? Check out the tutorial below on how to turn off Google location tracking by deactivating the location services on your phone.
Step 1: Unlock your Vivo X90S mobile device.
Step 2: Hold the Status bar and then swipe it down to bring out the Vivo X90S device Control.
Step 3: Find and click Location.
![]()
Step 4: Lastly, click Close to confirm the changes.
Method 2: Deactivate the Google App’s location access on your Vivo X90S mobile device
Let’s say you don’t want to cut the entire location access across your smartphone because other apps might malfunction. That’s fine. There is a way to deactivate the Google app’s location permission while the other apps remain unaffected. Are you more inclined to implement this decentralized approach? Check out the tutorial provided below.
Step 1: Go to the Settings app on your Vivo X90S smartphone.
Step 2: Click Apps.
![]()
Step 3: Find and click Google on the list.
![]()
Step 4: Click Permissions.
![]()
Step 5: Click Location.
![]()
Step 6: Lastly, click Don’t Allow. Alternatively, you may instead select Allow Only While Using the App or Ask Every Time if you wish to grant Google conditional access to your location data.
![]()

Key features:
• Import from any devices and cams, including GoPro and drones. All formats supported. Сurrently the only free video editor that allows users to export in a new H265/HEVC codec, something essential for those working with 4K and HD.
• Everything for hassle-free basic editing: cut, crop and merge files, add titles and favorite music
• Visual effects, advanced color correction and trendy Instagram-like filters
• All multimedia processing done from one app: video editing capabilities reinforced by a video converter, a screen capture, a video capture, a disc burner and a YouTube uploader
• Non-linear editing: edit several files with simultaneously
• Easy export to social networks: special profiles for YouTube, Facebook, Vimeo, Twitter and Instagram
• High quality export – no conversion quality loss, double export speed even of HD files due to hardware acceleration
• Stabilization tool will turn shaky or jittery footage into a more stable video automatically.
• Essential toolset for professional video editing: blending modes, Mask tool, advanced multiple-color Chroma Key
Method 3: Toggle off the Timeline feature on your Google Account
Timeline is a special Google feature that keeps a record of your location check-ins and routes taken for future reference. You can review it on the Google Maps app in case you need to visit the same place again. On the other hand, you can easily toggle it off if you don’t want Google tracking down your specific whereabouts. Here’s the guide on how to do it in easy steps.
For mobile users
Step 1: Launch the Google mobile application on your Vivo X90S smartphone.
Step 2: Click your Profile icon at the top-right corner of the screen.
![]()
Step 3: Click Google Account.
![]()
Step 4: Click Data Privacy.
![]()
Step 5: Find and click Timeline.
![]()
Step 6: Scroll down and then tap the Turn Off button.
![]()
For web users
Step 1: Visit the official website of My Google Activity. Right after, log in to the Gmail account you particularly use on your Vivo X90S mobile device.
Step 2: On the main dashboard, click Timeline.
![]()
Step 3: Scroll it down and then click the Turn Off button.
![]()

Method 4: Remove visits on Google Maps
If Timeline is previously activated on your Vivo X90S, chances are Google Maps has recorded all your recent visits. Don’t worry. You can easily delete them and finally turn off Google location tracking once and for all. Here’s a short guide on how to do it in easy steps.
Step 1: Launch the Google Maps app on your Vivo X90S smartphone.
Step 2: Click the Profile icon at the top-right corner of the screen.
Parental Control Software
Step 3: Then click Your Timeline.
![]()
Step 4: Click Places. Scroll down and then click Visited All Places just below the map.
![]()
Step 5: Pick a location and click the Three-dotted menu button next to it. From there, select Remove All Visits.
Part 3. Keep Your Whereabouts Private With Wondershare Dr.Fone
Google surely understands that some users are uncomfortable sharing their whereabouts with the platform. That’s why you’re given the option to turn off Google location tracking on your Vivo X90S smartphone. However, take note that doing so might gravely affect the functionality of some Google products. If you don’t want it to happen, there’s an alternative solution you can try. Rather than denying Google access to your location, why not change it instead and register a fake one? Yes. That can absolutely help you conceal your whereabouts without compromising the quality of Google services. Don’t worry. It’s a piece of cake. Wondershare Dr.Fone can help you a lot in this regard. It has a potent Virtual Location feature capable of modifying your whereabouts and simulating GPS movements. Do you want to try it now? Here’s a short guide for you.
Step 1: Download Wondershare Dr.Fone from its official website. Subsequently, install it on your computer.
Step 2: Launch the newly installed software on your desktop. Once it fully loads up, connect your Vivo X90S smartphone using a data cable. Follow the on-screen instructions to make sure that the connection between the two devices is stable enough to handle the succeeding procedures.
Step 3: Go to the left-side panel and then click Toolbox. On the main dashboard, click Virtual Location. Is it your first time accessing this feature? If so, Wondershare Dr.Fone will then download additional resources from the server. Don’t worry. The downloading process will only take a few minutes.
Step 4: After completing the downloading process, Wondershare Dr.Fone - Virtual Location will open in a separate window. From there, navigate to the top-right menu bar and then click Teleport Mode.

Step 5: Head over to the search bar at the top-left corner of the screen and then enter your desired location. Choose one from the suggestions that Wondershare Dr.Fone displays on the screen. Right after, click the Enter icon.

Step 6: The description of your chosen location will be then flashed on the screen. Read the details and make sure they are accurate. After that, click Move Here to proceed.

Step 7: The location registered on your Vivo X90S mobile device will now be replaced with your modified whereabouts. Verify the changes applied on your smartphone by checking Google Maps and searching for your current location. One way or another, it must show the altered result.
NOTE: If you want to restore your original location settings, simply disconnect your smartphone from the computer and restart it.
Conclusion
At some point, we cannot deny that Google location services make our lives a lot more convenient. Imagine you can easily locate a particular place and get directions by simply browsing Google Maps. No need to borrow an Atlas from the library just to find a location you want to visit. However, in exchange for this convenience, you have to share location access with Google. Some users are not confident to access this privilege at the expense of their privacy. Don’t worry. That’s totally fine. If you’re one of them, this article can help you turn off Google location tracking on your Vivo X90S. Is there a more conservative approach to address this issue? Luckily, there is. Download Wondershare Dr.Fone on your computer and take advantage of its Virtual Location feature. It can help modify your whereabouts and simulate GPS movements without going outdoors.
- Title: How to Spy on Text Messages from Computer & Vivo X90S | Dr.fone
- Author: Marray
- Created at : 2024-07-21 22:10:10
- Updated at : 2024-07-22 22:10:10
- Link: https://android-location-track.techidaily.com/how-to-spy-on-text-messages-from-computer-and-vivo-x90s-drfone-by-drfone-virtual-android/
- License: This work is licensed under CC BY-NC-SA 4.0.